Aplikasi LED dan Switch


1. Tujuan [kembali]
 a. Menyelidiki Karakteristik kerja LED dan Switch
 b. Memahami prinsip kerja dari Mikroprosesor dan Mikrokontroler
 c. Mampu mebuat rangkaian sederhana tentang LED dan Switch

2. Alat dan Bahan [kembali]
 a. PIC 16F887 dan PIC 16F877
 b. Button
 c. Crystal
 d. Kapasitor
 e. LED
 f. Switch
 g. Jumper
 h. Resistor
 i. dll

3. Dasar Teori [kembali]
 a. PIC16F887 adalah salah satu produk terbaru dari Microchip. Ini menampilkan semua komponen yang biasanya dimiliki mikrokontroler modern. Untuk harga murah, beragam aplikasi, kualitas tinggi dan ketersediaan yang mudah, ini adalah solusi ideal untuk aplikasi seperti : pengendalian berbagai proses di industri, perangkat kontrol mesin, pengukuran nilai yang berbeda, dll. Beberapa fitur utamanya adalah tercantum di bawah ini.
  • Arsitektur RISC 
            a. Hanya 35 petunjuk untuk belajar
            b. Semua intruksi siklus tunggal kecuali cabang
  • Frekuensi operasi 0-20 MHz
  • Osilator internal presisi
           a. Pabrik dikalibrasi
           b. Rentang frekuensi  perangkat lunak yang dipilih 8 MHz sampai 31 KHz
  • Power supply voltage 2.0-5.5 V 
  • Hemat Daya Mode Tidur
  • Brown-out Reset (BOR) dengan pilihan kontrol perangkat lunak
  • 35 pin input/output
  • Memori ROM 8k dalam teknologi FLASH
  • Opsi Pemograman Serial-Circuit
  • Memori EPROM 256 byte
  • 368 byte memori RAM
  • A/D converter
  • 3 timer/counter independen
 b. Kapasitor adalah suatu alat yang dapat menyimpan energi di dalam medan listrik, dengan cara mengumpulkan ketidakseimbangan internal dari muatan listrik. Kondensator memiliki satuan yang disebut Farad dari nama Michael Faraday.

   c. Crystal  adalah komponen Elektronika yang memiliki fungsi sama dengan Resonator. yaitu untuk menghasilkan denyut atau detak pada Komponen Elektronika yang membutuhkan detak Clock. Crystal memiliki 2 kaki, yang jika digunakan pada IC mikrokontroler maka kedua kaki pin koneksikan dengan XTAL1 dan XTAL 2. Kelebihan Crystal adalah detaknya relatif stabil. tetapi kelemahannya adalah rangkaian menjadi sedikit rumit, karena membutuhkan tambahan Kapasitor untuk menstabilkan detak tang dihasilkan oleh crystal.
Crystal memiliki banyak nilai dengan satuan Mhz. untuk penggunaan pada Mikrokontroler biasanya menggunakan crystal dengan nilai detak 11.059200 Mhz, sedangkan untuk Arduino biasanya menggunakan crystal bernilai 16.000000 Mhz.
  d. Button
Adalah switch yang dapat menghubungkan 3 Jalur sekaligus jika ditekan, dan akan memutuskan jika ditekan sekali lagi. itu artinya push button ini saat ditekan pertama akan tertahan, dan jika ditekan sekali lagi akan terlepas.


4. Simulasi [kembali] 

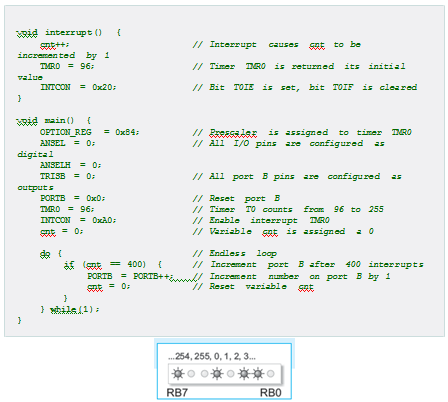
5. Program dan Listing [kembali]

void main(){                            //Fungsi Utama
     ANSEL=0;                         //I/O dilakukan secara digital
     ANSELH=0;
     PORTB=0b01010101;       //LED 1,3,5,7 akan hidup dan selebihnya mati
     TRISB=0;                           //PortB sebagai Output
}

6. Flowchart [kembali]

7. Video [kembali]

8. Unduhan [kembali]
 File rangkaian, HTML, Program download Disini
Read more

Using EEPROM Memory

This example illustrates write to and read from built-in EEPROM memory. The program works as follows. The main loop constantly reads EEPROM memory location at address 5 (decimal). The program then enters an endless loop in which PORTB is incremented  and PORTA.2 input state is checked. At the moment of pressing the push button called MEMO, a number stored in PORTB will be saved in EEPROM and directly read and shown on PORTD in binary form.


In order  to check  this  circuit,  it is sufficient  to press  the MEMO  button  and turn  off the device.  After  restarting  the  device,  the  program  will  display  the  saved  value  on  port  D. Remember that at the moment of writing, this value was displayed on port B).


In order to make this example work properly, it is necessary to tick off the EEPROM library in the Library Manager prior to compiling:

§                    EEPROM


Read more

Using A/D converter

The  PIC16F887  A/D  converter  is  used  in  this  example.  Is  it  necessary  to  mention  that everything is rather simple?! A variable analog signal is applied to the AN2 pin, while the 10- bit result of conversion  is shown on ports B and D (8 LSBs on port D and 2 MSBs on port B). GND is used as negative voltage reference Vref-, while positive voltage reference is applied to the AN3 pin. It enables voltage measurement scale to 'stretch and shrink'.

In other words, the A/D converter always generates a 10-bit binary result, which means that it detects  a total  of 1024  voltage  levels  (210=1024).  The difference  between  two voltage levels is not always the same. The less the difference between Vref+ and Vref-, the less the difference  between  two of 1024 levels. As seen, the A/D converter  is able to detect slight changes in voltage.


In order to make this example  work properly,  it is necessary  to tick off the ADC library in the Library Manager prior to compiling:


Read more

Module CCP1 as PWM signal generator

This  example  illustrates  the  use  of  CCP1  module  in  PWM  mode.  To  make  things  more interesting,   the  duration   of  the  P1A  output  pulses  (PORTC,2)   may  be  changed  using pushbuttons  symbolically  marked as ‘DARK’ and ‘BRIGHT’,  while the set duration is seen as binary combination on port B. The operation of this module is under control of the functions belonging to the specialized PWM Library. Three of them are used here:
1.               PWM1_init has                 the                 prototype: void Pwm1_Init(long freq);
Parameter  freq  sets  the  frequency  of  PWM  signal  expressed  in  herz.  In  this  example  it amounts to 5kHz.
2.               PWM1_Start has the prototype: void Pwm1_Start(void);
3.               PWM1_Set_Duty  has           the           prototype: void Pwm1_Set_Duty(unsigned short duty_ratio);
Parameter duty_ratio sets pulse duration in pulse sequence.
The  PWM  library  also  contains  the PWM_Stop function   used  to  disable  this  mode.  Its prototype is: void Pwm1_Stop(void);

In order to make this example work properly, it is necessary to tick off the following libraries in the Library Manager prior to compiling:

§                    PWM
§                    Button


Read more

Using watch-dog timer

This example  illustrates  how the watch-dog  timer should not be used. A command  used for resetting this timer is intentionally left out in the main program loop, thus enabling it to win the time battle and cause the microcontroller  to be reset. As a result, the microcontroller

will be reset all the time, which is reflected as PORTB LED blinking.

In order to make this example work properly, it is necessary to enable the watchdog timer by selecting the Watchdog Timer - Enabled option in mE programmer.


Read more

Using timers TMR0, TMR1 and TMR2. Using interrupts, declaring new function...


If you have read the previous example, you probably have noticed a disadvantage of providing delays using loops.  In all those cases,  the microcontroller  is ‘captive’  and does nothing.  It simply waits for some time to pass. Such waste of time is an unacceptable  luxury and some other method should be applied therefore.

Do you remember the story about timers? Interrupts? This example makes links between them in a practical way. The schematic is still the same as well as the challenge. It is necessary to provide a delay long enough to notice changes on a port. Timer TMR0 with assigned prescaler is used for this purpose. An interrupt is generated on every timer register overflow and every interrupt  routine  automatically  increments  the cnt variable  by 1. When  it’s value  reaches
400, the port B is incremented by 1. The whole procedure is performed ‘behind the scenes’,

which enables the microcontroller to do something else.


Interrupt occurs on every timer register TMR0 overflow.


In this case, an interrupt is enabled after the timer register TMR1 (TMR1H, TMR1L) overflow

occurs. Combination of bits changing on port B is different from that in the previous example.


This    time,    an    interrupt    occurs    after    timer    register    TMR2    overflow    occurs. The Replace function, which normally doesn’t belong to C, is used in this example to invert port pins state.


Read more

TMR0 as a counter, declaring new variables, enumerated constants, using relay ...

Referring to the previous examples, the microcontroller  executes the program without being affected in any way by its surrounding. Practically, devices operating in this manner are very rare  (for example,  simple  neon sign controller).  Input  pins are also used in this example. There is a schematic  in figure below, while the program  is on the next page. It’s still very simple. Timer TMR0 is used as a counter. The counter input is connected to a push button so that any button  press  causes  timer  TMR0 to count one pulse.  When  the number  of pulses matches the number stored in the TEST register, a logic one (5V) appears on the pin PORTD.3. This  voltage  activates  an  electromechanical   relay,  and  this  bit  is  called  ‘RELAY’  in  the program, therefore.

In this example, the TEST register stores number 5. Of course, it can be any number obtained either by computing or defined as a constant. Besides, the microcontroller  can activate some other device instead of relay, while the sensor can be used instead of the push button. This example  illustrates  one  of  the  most  common  applications  of  the  microcontroller   in  the industry; when something is performed as many times as needed, then something else should
be turned on or off....

Only one enumerated  constant  RELAY  is used in this example.  It is assigned  a value when
declared.

All the  constants,  following  those  with  assigned  values  (RELAY  = 3 and  MOTOR  = 6),  are automatically  assigned  values incremented  by 1 relative  to the previous  constant  value. In this  example,  constants  HEATER  and  PUMP  will  be  assigned  values  4 and  7,  respectively (HEATER = 4 and PUMP = 7).
Read more